
Tumbled Tiles - October Stamper's Group

October Stampers group was all about Tumbled tiles! These tiles are waterproof and will protect your table surfaces, as well as being absorbant of any condensation or spillage from the glass. These make a wonderful Christmas, House-Warming, Birthday, etc...Gifts!


I purchased the tiles at "Home Depot" in Vernon. The cost was $5.99 for 9 tiles. Supplies:
  • tiles
  • rubbing alcohol/cotton wipe
  • stazon
  • stamps (preferably open images you can color in)
  • pastel chalks
  • blender pens
  • krylon finishing spray (I used matte)
  • vinyl bumpers (I asked for the thingys for preventing banging when the doors close-these are to prevent damage to your tables etc.)

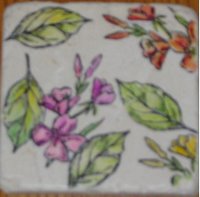
Clean the surface of the tile using rubbing alcohol and cotton. Using Stazon ink, stamp images to tiles. It shouldn't take too long to dry, you can start coloring very shortly. Use your blender pen to pick up chalk (being very careful not to get the entire surface wet as it will ruin your chalk-just use a tiny corner of the chalk) color your images using lighter and darker colors, creating shadows dependant on your image. If you are doing flowers, the outer petals should be lighter and the "natural" shadows should be darker.

After your images are completely colored in, you will want to take your tile outdoors or to a well-ventilated area. Make sure you have covered your surface under the tile. Spray the surface with the Krylon, making sure the entire surface is covered. If need be, you can spray a second time.

Enjoy! I would love it if you want to share the tiles you make, just email them to me or try to upload via the comment box.


Comments

Popular posts from this blog

Blog Candy Giveaway

Ok, I am so thrilled to be a Grandma! Addison (see previous post) is so adorable and gives me much "Love and Happiness" that I have to share some "LOVE and HAPPINESS" with you. Here's how it will work: Leave a comment with this posting about anything, especially "baby" or "baby & stamping" related. Leave me a link as well if you have some online samples. We will leave this for one week, and on Friday Feb 29 (leap year too ;) I will make a random drawing and announce the winner. What will you win? You will receive from me, the "Love and Happiness" rubons shown with this posting. These are great for both Stamping and Scrapbooking as they are acid free and scrapbook safe. The package includes 4 sheets, Black, White, Old Olive and Chocolate Chip...in the images shown. You can use Rub ons on paper and most nonporous surfaces including glass, photos, clipboards, candles and more. (check the photo here for a sample) The only limit wil

Decor Element Sample

Just thought I would share with you where I put my first Decor Elements. I wanted to put this in my stamping room but really, if you have seen my room, there is no place on the walls to put it. I figured above the door is a good spot, perfect size and I look straight at it when I am busy "creating" My boys decided I needed a letter "C" to put in front so I have ordered and received it, just haven't put it up yet. If you come by my stamp room, be sure to have a peek at it for real. Oh, and these are super easy to apply. I did have some difficulty with the "dots" however, I have since received some tips and if you plan to get these, I will share them with you. :) Stampin' Up! has also created both an instruction sheet and a video for applying these.

Love is in the air! Yes, it is Wedding season starting.

I have to attend a shower tonight so I got myself busy and made 2 cards for 2 brides to be. The first wedding is taking place this coming Friday, and the second on the 2nd weekend in April. I saw on someone else's blog recently, (i am sorry, I can't remember where as I read too many) a challenge to create a card with no cardstock layers. These are 2 that I came up with. The Wedding this Friday(also my anniversary), the colours are pink and black so I took those colours into consideration when I chose my inks. What do you think? Have you challenged yourself to stamp with only ink and a base Card? Give it a try and see what you can come up with. The second card using this challenge is not with any specific colour theme for the wedding, I didn't know what the colours are so I just used my imagination. Besides, this colour went well with the wrapping paper my daughter got and wrapped the gift in. Both these cards use the shape from "Sweet Shapes" for the base, and the